I also regularly stand up to stretch but prefer to limit that to back roads. On highways/interstates where traffic is usually moving faster than I am my preference is to stay seated.
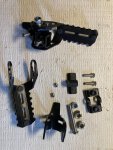
The foot pegs are offered by several sellers on amazon (and likely found on ebay). I paid about $22 USD
https://www.amazon.com/dp/B0BBCN6M41?ref=ppx_yo2ov_dt_b_product_details&th=1
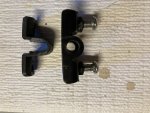
The pegs are good in theory, but the design of the securing bracket does not work well in real world use.
View attachment 6888
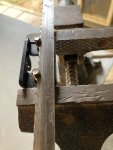
I had tightened the securing bracket to the point where I was pushing the limit and feared snapping the screw heads off (it happens sometimes).
View attachment 6889
View attachment 6890View attachment 6891
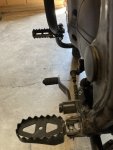
Folded the pegs out during my ride to the beginning of Section 6 of the MABDR yesterday. On a nice stretch of PA Rte 34 heading towards Mt Holly Springs I placed my feet on the pegs to get a little stretch. Rode over a bit of wavy road and that combined with vibration and the weight of my feet caused both pegs to move.
View attachment 6892
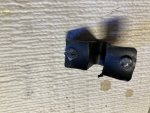
You may look at the photo above and think that I did not adequately tightened the bracket.
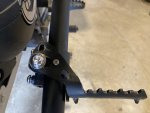
The photo below shows where the ends of the securing screws penetrated the plastic buffer and dug into the Givi engine guard.
View attachment 6894
The pegs would be more secure if this bracket was directly attached to the engine guard. May need to borrow my welder back from my buddy again.
View attachment 6895View attachment 6896
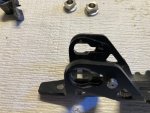
A challenge in getting these mounted are the two cam bushings shown at the top of the photo below. These need to seat fully into both of the corresponding slots of the mounting bracket and the footpeg rest.
View attachment 6897
Not abandoning these yet. If anyone else gets or has already used this GS ADV style foot rest, and has them securely mounted, please share your success.
I had "highway pegs" on my KLR that proved a worth while addition so would like to repeat the same functionality on my Himalayan.
https://www.happy-trail.com/eg4-engine-guard-highway-peg-kawasaki-klr650-all-years.html
View attachment 6898

")