RotorWrench
Well travelled
- Location
- USA
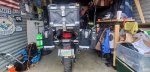
Installed a new switch for my aux lights this evening. With an overwhelming selection of waterproof two and three wire switches available I lost a lot of time researching and trying to decide which one would work best for my use, needing it to be lighted, reliable and weatherproof.
I ended up going with the same switch I used on one of our 4wheelers that I use for snow plowing and other chores. It's a bar mount and has been on the atv for three years now, in summer heat and - 38F, in sun, rain and snow, with no failures. I chose the red backlight, other colors being available.
During my search I came across another one I liked because of its compactness and versatile mounting bracket. I ordered it as well. The combined cost was around $21.
I had a hard time deciding which to mount because both are well made and each has their advantages depending on mounting and space. While I was already familiar and trusting of the bar mount model, I did hook up and test the other one. It worked fine and I liked the subdued backlighting when on. I can't vouch for its reliability but it appears to be well made and has a positive switching action. No problem activating either with gloves. I'm going to mount the other on my wife's 4wheeler for her backup light.
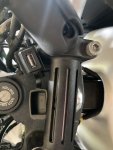
What I like about the silver one, which I'm going to paint black, is the mounting bracket. As you can see in the photo where I'm holding it up, it would easily mount on the clutch perch bolt where it would be closer to my grip.
The point of this post is to share other possible switch options for anyone looking or planning future installs, especially if you don't already have a favorite or can't decide. Both on Amazon. FWIW


I ended up going with the same switch I used on one of our 4wheelers that I use for snow plowing and other chores. It's a bar mount and has been on the atv for three years now, in summer heat and - 38F, in sun, rain and snow, with no failures. I chose the red backlight, other colors being available.
During my search I came across another one I liked because of its compactness and versatile mounting bracket. I ordered it as well. The combined cost was around $21.
I had a hard time deciding which to mount because both are well made and each has their advantages depending on mounting and space. While I was already familiar and trusting of the bar mount model, I did hook up and test the other one. It worked fine and I liked the subdued backlighting when on. I can't vouch for its reliability but it appears to be well made and has a positive switching action. No problem activating either with gloves. I'm going to mount the other on my wife's 4wheeler for her backup light.
What I like about the silver one, which I'm going to paint black, is the mounting bracket. As you can see in the photo where I'm holding it up, it would easily mount on the clutch perch bolt where it would be closer to my grip.
The point of this post is to share other possible switch options for anyone looking or planning future installs, especially if you don't already have a favorite or can't decide. Both on Amazon. FWIW
 Oops! Sorry, I thought I had.
  , but since it was apart I took a couple of cotton tips soaked in carby cleaner and cleaned everthing metal. Then I rubbed on a very light film of dielectric grease before reassembling.