madbiker
Well travelled
- Location
- United Kingdom
Part One
As i mentioned in my 1st of January post on my RTW Trip thread in Ride Reports I had an engine seizure that caused considerable damage to the engine. As I was visiting a friend who lives in a very rural area of Northern Spain and who, not being mechanically minded, i had little in the way of a good tool selection at my disposal to undetake this major repair.
As a result of his remote location the ordering and delivery of spares was a long slow complicated process. My workshop was a roofless outhouse that in a former life was a place where animals were kept. Not the best place to carry out the work needed however, I did manage to borrow a bike lift and a torque wrench from a friend of my friend and this made the engine removal much easier.
Okay without further explanation I shall describe what damage was caused, what parts that I replaced and any information that I learned that is not in the engine manual or that I think may be of use to anyone else doing this type of work on a Himalayan engine.
As I had lots of time waiting on parts arriving, I decided to also strip and service front and rear suspension and wheels. As there are a lot of previous posts by other contributors on these particular topics I will not discuss them here. This post will solely be about the engine.
As I am limited to the number of pictures that I can post and if you want to see all of the pictures that I took you can find them here by clicking on this link. https://flic.kr/s/aHBqjzxb3N
I began by removing all of the usual stuff, fuel tank, battery, coil, air pulse valve, clutch cable, exhaust, starter motor, and disconnecting all the electrical connections to the engine. All very straightforward.
I then also removed the framework that supports the clocks and headlamp etc. Again all straightforward stuff.
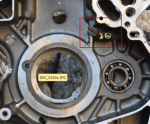
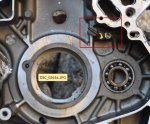
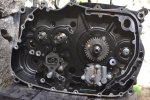
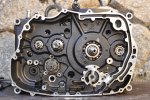
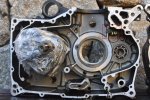
Then I drained the oil, removed the oil cooler and removed both side casings.


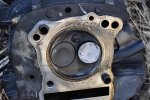
Then I removed the rocker cover, camshaft, and cylinder head. All very easy but just remember that two of the bolts securing the rocker cover to the cylinder head can only be accessed once the tappet covers have been removed.

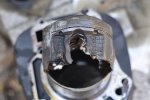
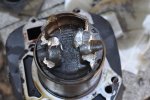
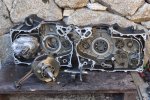
The cylinder barrel compete with piston stuck inside it came off next and that it when I saw the con rod with the gudgeon pin welded in to it. It was also slightly bent.
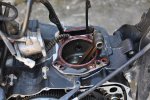
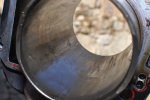
The piston had melted and the barrel was badly scored. Both junk.
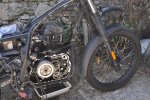
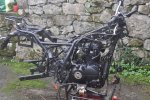
Then I made use of the borrowed bike lift. I supported the engine with it and removed the bolts holding the engine cradle to the frame and lowered the engine. It was quite a tight fit but after some hefty blows it came apart. Again nothing difficult here apart from the weight of the engine being much more of an issue had I not had the bike lift.
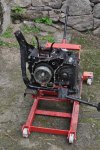
Once the engine was out the bike was starting to look a little weird.

I was now ready to dismantle the engine. My workbench was a raised ledge about 3 feet off the ground which my friend used for his pot plants. On top of this I sat a wooden plinth (like half a pallet) and this was to be my workbench. I will continue with the detailed engine strip down in part 2.
As i mentioned in my 1st of January post on my RTW Trip thread in Ride Reports I had an engine seizure that caused considerable damage to the engine. As I was visiting a friend who lives in a very rural area of Northern Spain and who, not being mechanically minded, i had little in the way of a good tool selection at my disposal to undetake this major repair.
As a result of his remote location the ordering and delivery of spares was a long slow complicated process. My workshop was a roofless outhouse that in a former life was a place where animals were kept. Not the best place to carry out the work needed however, I did manage to borrow a bike lift and a torque wrench from a friend of my friend and this made the engine removal much easier.
Okay without further explanation I shall describe what damage was caused, what parts that I replaced and any information that I learned that is not in the engine manual or that I think may be of use to anyone else doing this type of work on a Himalayan engine.
As I had lots of time waiting on parts arriving, I decided to also strip and service front and rear suspension and wheels. As there are a lot of previous posts by other contributors on these particular topics I will not discuss them here. This post will solely be about the engine.
As I am limited to the number of pictures that I can post and if you want to see all of the pictures that I took you can find them here by clicking on this link. https://flic.kr/s/aHBqjzxb3N
I began by removing all of the usual stuff, fuel tank, battery, coil, air pulse valve, clutch cable, exhaust, starter motor, and disconnecting all the electrical connections to the engine. All very straightforward.
I then also removed the framework that supports the clocks and headlamp etc. Again all straightforward stuff.
Then I drained the oil, removed the oil cooler and removed both side casings.
Then I removed the rocker cover, camshaft, and cylinder head. All very easy but just remember that two of the bolts securing the rocker cover to the cylinder head can only be accessed once the tappet covers have been removed.
The cylinder barrel compete with piston stuck inside it came off next and that it when I saw the con rod with the gudgeon pin welded in to it. It was also slightly bent.
The piston had melted and the barrel was badly scored. Both junk.
Then I made use of the borrowed bike lift. I supported the engine with it and removed the bolts holding the engine cradle to the frame and lowered the engine. It was quite a tight fit but after some hefty blows it came apart. Again nothing difficult here apart from the weight of the engine being much more of an issue had I not had the bike lift.
Once the engine was out the bike was starting to look a little weird.
I was now ready to dismantle the engine. My workbench was a raised ledge about 3 feet off the ground which my friend used for his pot plants. On top of this I sat a wooden plinth (like half a pallet) and this was to be my workbench. I will continue with the detailed engine strip down in part 2.
Last edited:

") (I hope that I never need it!).
(I hope that I never need it!).